SAML2
1. 创建配置文件
创建
sso.json默认路径为/data/hap/script/volume/sso/sso.json,内容如下:
注意:如果挂载后依然出现 404 ,可将内容复制到 json.cn 中验证json格式是否合法
{
  "mode": "common-saml2",
  "name": "saml2",
  "saml2": {
    "entityId": "{HAP}/orgsso/metadata.xml",
    "assertUrl": "{HAP}/orgsso/assert",
    "params": {
      "UserId": "name_id",
      "Name": "http://schemas.xmlsoap.org/ws/2005/05/identity/claims/name",
      "Email": "http://schemas.xmlsoap.org/ws/2005/05/identity/claims/emailaddress"
    },
    "autoRegister": true,
    "projectId": ""
  }
}
部分参数及解释
| 参数 | 类型 | 是否必须 | 含义 |
|---|---|---|---|
| saml2.entityId | String | 是 | SP的唯一标识符,通常设为SP metadata地址,{HAP}/orgsso/metadata.xml ; 如 http://192.168.10.20:8880/orgsso/metadata.xml |
| saml2.assertUrl | String | 是 | SP断言地址,接收SAMLResponse;固定设置为 {HAP}/orgsso/assert,需要在IDP配置;如 http://192.168.10.20:8880/orgsso/assert |
| saml2.params | Object | 是 | 返回用户信息字段映射规则,key为固定字段value根据实际用户信息配置;参数配置方法 |
| saml2.params.UserId | String | 是 | 用户唯一标识 |
| saml2.params.Name | String | 是 | 姓名,如用户已存在会更新覆盖 |
| saml2.params.Email | String | 否 | 邮箱;通过邮箱查找或者注册此字段必须设置; 邮箱或者手机号必须设置其中一个;如已经绑定第三方关系的,可通过关系查找用户,邮箱或手机可不设置 |
| saml2.params.Mobile | String | 否 | 手机号;通过手机号查找或者注册此字段必须设置; |
| saml2.params.Positions | Array | 否 | 职位;自动更新用户的职位,不存在自动创建 |
| saml2.params.Departments | Array | 否 | 部门;自动更新用户的部门,不存在自动创建 |
| saml2.params.SystemLanguage | String | 否 | 登录后的系统语言,目前支持zh-Hans、en、ja、zh-Hant,默认为 zh-Hans |
| autoRegister | Boolean | 否 | 当账号不存在时,是否自动创建账号;默认为 true |
| projectId | String | 是 | HAP 组织编号;组织管理(右上角) > 组织信息(页)>组织编号ID;(多组织单点登录不需要配置此参数,见步骤3) ;如 1x-2x-3x-4x-5x |
创建IDP metadata文件
idp.xml默认路径为/data/hap/script/volume/sso/metadata/idp.xml,参考内容如下:
<EntityDescriptor entityID="https://saml2.domain.com" ID="pfxea2a0d2f-c296-4b4d-a108-53711984eee"
  xmlns:md="urn:oasis:names:tc:SAML:2.0:metadata">
  <IDPSSODescriptor WantAuthnRequestsSigned="false" protocolSupportEnumeration="urn:oasis:names:tc:SAML:2.0:protocol">
    <KeyDescriptor use="signing">
      <KeyInfo
        xmlns:ds="http://www.w3.org/2000/09/xmldsig#">
        <X509Data>
          <X509Certificate>MIIDHjCCAgagAw....</X509Certificate>
        </X509Data>
      </KeyInfo>
    </KeyDescriptor>
    <SingleLogoutService Binding="urn:oasis:names:tc:SAML:2.0:bindings:HTTP-Redirect" Location="https://saml2.domain.com/65681be085c07db1c8136eee/logout"/>
    <SingleSignOnService Binding="urn:oasis:names:tc:SAML:2.0:bindings:HTTP-Redirect" Location="https://saml2.domain.com/65681be085c07db1c8136eee"/>
    <SingleSignOnService Binding="urn:oasis:names:tc:SAML:2.0:bindings:HTTP-POST" Location="https://saml2.domain.com/65681be085c07db1c8136eee"/>
  </IDPSSODescriptor>
</EntityDescriptor>
该配置一般由IDP服务自动生成
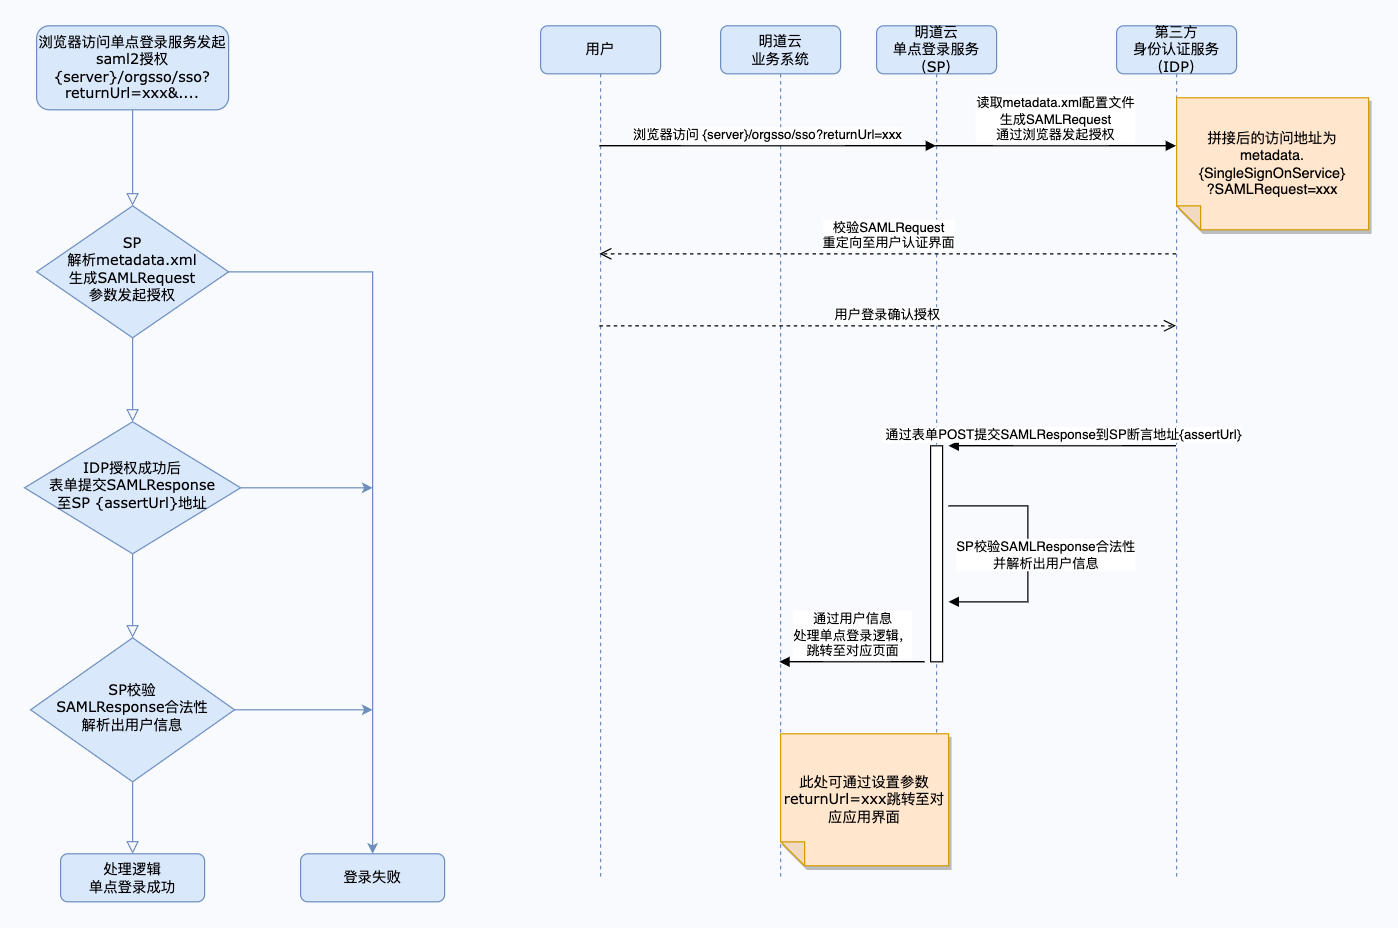
交互示意图

SP获取到IDP提交的 SAMLResponse
// IDP POST 过来的request body 大致如下
{
  SAMLResponse: 'PHNhbWxwOlJlc3BvbnNlIElEPSJwZngyNzQxM2ZiYi1mYTdmLTRjZWItYjkxY...'
  ...
}
通过 Base64 Decode + Inflate 返回用户,时间戳,签名等信息,如用户信息部分对应如下, 则params 配置:
...
<AttributeStatement>
    <Attribute Name="Name">
        <AttributeValue>Zhangsan</AttributeValue>
    </Attribute>
    <Attribute Name="PrimarySid">
        <AttributeValue>12345</AttributeValue>
    </Attribute>
    <Attribute Name="EmailAddress">
        <AttributeValue>test@doamin.com</AttributeValue>
    </Attribute>
  	...
</AttributeStatement>
...
根据以上👆返回,则params配置:
"params": {
  "UserId": "PrimarySid",
  "Name": "Name",
  "Email": "EmailAddress"
}
注意:微软ADFS身份认证源,以下属性申明会自动转换为映射的值
{
    "http://schemas.xmlsoap.org/ws/2005/05/identity/claims/emailaddress": "email",
    "http://schemas.xmlsoap.org/ws/2005/05/identity/claims/givenname": "given_name",
    "http://schemas.xmlsoap.org/ws/2005/05/identity/claims/name": "name",
    "http://schemas.xmlsoap.org/ws/2005/05/identity/claims/upn": "upn",
    "http://schemas.xmlsoap.org/claims/CommonName": "common_name",
    "http://schemas.xmlsoap.org/claims/Group": "group",
    "http://schemas.microsoft.com/ws/2008/06/identity/claims/role": "role",
    "http://schemas.xmlsoap.org/ws/2005/05/identity/claims/surname": "surname",
    "http://schemas.xmlsoap.org/ws/2005/05/identity/claims/privatepersonalidentifier": "ppid",
    "http://schemas.xmlsoap.org/ws/2005/05/identity/claims/nameidentifier": "name_id",
    "http://schemas.microsoft.com/ws/2008/06/identity/claims/authenticationmethod": "authentication_method",
    "http://schemas.xmlsoap.org/ws/2005/05/identity/claims/denyonlysid": "deny_only_group_sid",
    "http://schemas.microsoft.com/ws/2008/06/identity/claims/denyonlyprimarysid": "deny_only_primary_sid",
    "http://schemas.microsoft.com/ws/2008/06/identity/claims/denyonlyprimarygroupsid": "deny_only_primary_group_sid",
    "http://schemas.microsoft.com/ws/2008/06/identity/claims/groupsid": "group_sid",
    "http://schemas.microsoft.com/ws/2008/06/identity/claims/primarygroupsid": "primary_group_sid",
    "http://schemas.microsoft.com/ws/2008/06/identity/claims/primarysid": "primary_sid",
    "http://schemas.microsoft.com/ws/2008/06/identity/claims/windowsaccountname": "windows_account_name"
}
此时params可配置为
"params": {
  "UserId": "name_id",
  "Name": "name",  // 等同配置 "http://schemas.xmlsoap.org/ws/2005/05/identity/claims/name"
  "Email": "email" // 等同配置 "http://schemas.xmlsoap.org/ws/2005/05/identity/claims/emailaddress"
}
2. 挂载配置文件
修改微服务应用对应的
docker-compose.yaml, 默认路径/data/hap/script/docker-compose.yaml, 在volumes中增加文件挂载并重启微服务应用。
- ./volume/sso/sso.json:/usr/local/MDPrivateDeployment/sso/OptionFile/sso.json
- ./volume/sso/metadata/idp.xml:/usr/local/MDPrivateDeployment/sso/OptionFile/metadata/idp.xml
SP的 元数据metadata.xml,可通过访问
{HAP}/orgsso/metadata.xml默认为自签证书,如需自定义SP签名证书,需要挂载替换私钥和证书文件
- ./volume/sso/ssl/key.pem:/usr/local/MDPrivateDeployment/sso/OptionFile/ssl/key.pem # 替换私钥
- ./volume/sso/ssl/cert.crt:/usr/local/MDPrivateDeployment/sso/OptionFile/ssl/cert.crt # 替换证书
开启关系查找
如需要绑定第三方关联ID,则需要创建文件
extend.json默认路径/data/hap/script/volume/sso/extend.json内容如下
{
  "relation": true
}
增加挂载文件
- ./volume/sso/extend.json:/usr/local/MDPrivateDeployment/sso/extend.json
挂载配置完成需重启微服务应用
重启成功后可通过GET方式访问 {HAP}/orgsso/checkssoconfig 接口,查看配置文件是否挂载成功
3. 单点登录
单组织
浏览器访问: {HAP}/orgsso/sso?returnUrl={returnUrl}
多组织
浏览器访问: {HAP}/orgsso/sso?returnUrl={returnUrl}&appKey={appKey}&sign={sign}×tamp={timestamp}&projectId={projectId}
对于多组织 projectId 需要通过参数传递,还需要企业授权认证参数;
企业认证授权签名算法请参考:{HAP}/apidoc/zh-Hans/
{HAP} 为 HAP 系统地址,比如可替换为:http://192.168.10.20:8880
{returnUrl} 为登录成功后的跳转地址,可不填写;比如需要跳转应用页面,则可替换为:http://192.168.10.20:8880/app/cf595091-e3ac-4669-a320-068e55533c33/64477b37df36209b5f36f1cf/64477b4f61655012a90ed994?from=insite
如果访问过程中出现的 SSO Error 提示,则可以通过管理员账号登录 HAP 系统,点击右上角头像: 平台管理>运维管理>日志;搜索服务名为 sso,排查具体报错原因