Autonomous Integration
Basic AI features include: Worksheet field suggestions, custom worksheet fields, workflow code block auto-generation, and multi-language intelligent translation.
The basic AI functions in HAP are by default implemented using the OpenAI ChatCompletion API. Below is the basic information about the OpenAI API:
- API URL:
https://api.openai.com/v1/chat/completions - More information about the API: Please refer to the OpenAI official documentation
By default, HAP uses the OpenAI ChatCompletion API. However, in autonomous integration mode, it can be replaced with a third-party API compatible with OpenAI's interface.
1. Integrating Third-Party APIs Compatible with OpenAI
General Configuration Method
Configuration Path: Platform Mgt > Service Integration > AI Service > Basic AI Features
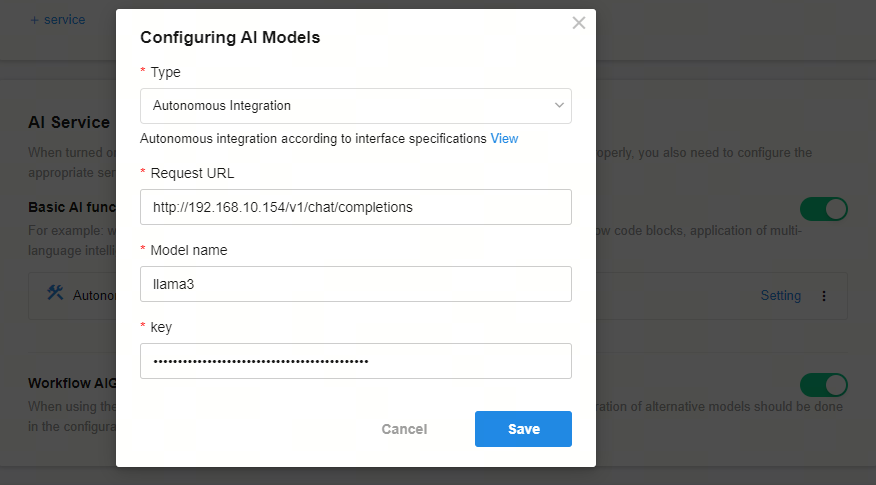
Select the "Autonomous Integration" type and configure the relevant parameters as shown in the image below:

Parameter Description:
| Parameter | Description | Example Value |
|---|---|---|
| Request URL | Enter the complete API path provided by the third-party service that is compatible with OpenAI. Note: Ensure that the network connection between the server and the interface is stable. | https://api.deepseek.com/v1/chat/completions |
| Model Name | Enter the model identifier from the service provider | deepseek-chat |
| key | Enter the access token provided by the third-party service | sk-******************************** |
DeepSeek Integration Example
| Parameter | Example Value |
|---|---|
| Request URL | https://api.deepseek.com/v1/chat/completions |
| Model Name | deepseek-chat |
| key | API key obtained from DeepSeek console |
Alibaba Cloud Bailian Platform Integration Example
| Parameter | Example Value |
|---|---|
| Request URL | https://dashscope.aliyuncs.com/compatible-mode/v1/chat/completions |
| Model Name | qwen-plus |
| key | API key obtained from Alibaba Cloud Bailian console |
Ollama Local Large Model Integration Example
| Parameter | Example Value |
|---|---|
| Request URL | Typically: {host}/v1/chat/completionsExample: http://192.168.10.154:11434/v1/chat/completions |
| Model Name | deepseek-r1:32b |
| key | Enter the key used for interface authentication. If the interface does not require key authentication, enter any non-empty string (e.g., example-key).Note: Key authentication is used to validate request legitimacy, so it's recommended to configure and fill in the correct key for security. |
2. Building Your Own OpenAI-Compatible API
Developers need to create their own API that matches the input and output formats of OpenAI's ChatCompletion API. Afterward, in the autonomous integration mode, configure your custom API, ensuring the input and output remain consistent with OpenAI.
Request Header
When HAP sends a request to OpenAI, it needs to include the Authorization parameter in the request header:
Authorization: Bearer $API_KEY
Request Body
The body of the request sent by HAP to OpenAI includes the following parameters:
{
    "model": "gpt-4o-mini",                             // Model name
    "messages": [
        {
            "role": "developer",                        // Role
            "content": "You are a helpful assistant."   // Content
        }
    ],
    "temperature": 1,                                   // Controls the randomness of the generated text. The higher the value, the more random the generated text.
    "top_p": 1,                                         // Core probability threshold. Controls the diversity of the generated text.
    "frequency_penalty": 0,                             // Penalizes repeated words to reduce repetition.
    "presence_penalty": 0,                              // Penalizes the appearance of unseen words to encourage new words.
    "stream": false                                     // Whether to use streaming.
}
Response Values
HAP only uses the following parameters from OpenAI's response:
-
When
streamis false:{"choices": [{"message": {"content": "Full content" // Complete response content}}]} -
When
streamis true:{"choices": [{"delta": {"content": "Chunk content" // Chunk of content}}]}
Example Code
Here is a sample code based on Baidu AI for integration.
Integrating Your Custom OpenAI-Compatible API
Once the API is developed and deployed, in HAP, go to Platform Mgt > Service Integration > AI Services > Basic AI Features, select Autonomous Integration as the type, and configure the Request URL, Model name, and Key as shown in the image below: